You just had window film installed. Now what?
Most homeowners worry about damaging their new window tint the first time they clean it. That’s understandable when you’ve invested in residential window tinting in Greenville to reduce heat, block UV rays, or add privacy. The good news? Window film is more durable than you think, and proper care is straightforward once you understand a few basic rules.
The key is knowing what to use, what to avoid, and when to start cleaning after installation. Get these basics right, and your film will look great and perform well for its entire 15-20 year lifespan.
Quick Answer
Wait 30 days after installation before cleaning window film to allow proper curing. Clean with mild dish soap and water using a soft microfiber cloth or squeegee. Spray cleaner onto the cloth, not directly on the film. Avoid ammonia-based cleaners (like Windex), abrasive materials, sharp objects, and excessive pressure. Clean every 1-3 months for best results. Proper care maintains film appearance and ensures warranty coverage remains valid.
Key Takeaways
- Wait 30 days after installation before first cleaning (curing period)
- Use only ammonia-free cleaners or mild soap and water
- Apply cleaner to cloth, not directly to film surface
- Soft microfiber cloths and rubber squeegees are safe
- Never use paper towels, abrasive pads, or scrapers
- Clean from top to bottom in overlapping strokes
- Dry with a clean microfiber cloth to prevent streaks
- Avoid cleaning in direct sunlight or extreme heat
- Most damage comes from improper cleaning, not normal use
- Professional-grade film resists scratching from normal cleaning
The Critical First 30 Days
Here’s the mistake most people make: cleaning too soon after installation.
Understanding the Curing Process
Window film isn’t fully bonded to your glass immediately after installation. The adhesive needs time to cure completely. During this period, moisture trapped between the film and glass gradually evaporates and the adhesive fully sets.
You might notice the film looks slightly hazy or has small water bubbles during the first few weeks. This is completely normal. The appearance clears as curing completes.
Curing Timeline:
- Days 1-7: Significant moisture visible, film may appear cloudy
- Days 8-20: Gradual clearing, bubbles shrinking
- Days 21-30: Film should be mostly clear
- Day 30+: Fully cured, ready for cleaning
The exact timeline varies based on:
- Weather conditions (sunny/warm speeds curing, cloudy/cold slows it)
- Film thickness (thicker films take slightly longer)
- Glass type (dual-pane windows cure slower than single-pane)
- Humidity levels (higher humidity slows the process)
Why This Matters: Cleaning during the curing period can disturb the adhesive bond, cause film to lift at edges, or trap additional moisture under the film. None of these are immediately catastrophic, but they shorten film lifespan and affect appearance.
During those first 30 days, resist the urge to clean even if you see handprints or smudges. They’ll wait. Your film’s long-term performance won’t.
What You Can Do During Curing
You’re not completely prohibited from touching the film, just from aggressive cleaning.
Allowed:
- Gently wiping dust with a very soft, dry microfiber cloth
- Looking at the film (observation doesn’t require touch)
- Operating windows normally if they open and close
Not Allowed:
- Wet cleaning of any kind
- Applying cleaning products
- Scraping or scrubbing
- Using squeegees
- Touching the film unnecessarily
Think of it like a healing wound. You can look at it, but you shouldn’t poke at it.
Safe Cleaning Products
What you use to clean window film matters as much as how you clean it.
Ammonia-Free Commercial Cleaners
Several brands make cleaners specifically designed for window film. These are formulated to clean effectively without damaging the film or adhesive.
Look for products labeled:
- “Ammonia-free”
- “Safe for window film”
- “Safe for tinted windows”
Common acceptable brands include some formulations from major manufacturers, but always check the label. Even within a single brand, different products may or may not be ammonia-free.
DIY Cleaning Solution
The safest, cheapest option is making your own cleaner at home.
Recipe:
- 1 quart (4 cups) distilled water
- 1-2 drops mild dish soap (Dawn, Palmolive, etc.)
- Mix gently in a spray bottle
This solution is:
- Gentle enough not to damage film
- Effective at removing dirt and fingerprints
- Essentially free
- Always ammonia-free
The key is using very little soap. One or two drops per quart is plenty. Too much soap leaves residue that creates streaks.
What to Absolutely Avoid
These products will damage window film:
Ammonia-Based Cleaners Windex and similar glass cleaners contain ammonia. Ammonia breaks down the adhesive layer in window film over time and can cause discoloration. One use probably won’t destroy your film, but repeated use will.
Abrasive Cleaners Anything with scrubbing particles, powder, or grit. These create micro-scratches that accumulate over time, making film look cloudy or dull. This includes:
- Comet
- Ajax
- Baking soda pastes
- Any “scrubbing” formulation
Vinegar Solutions Despite being popular for natural cleaning, vinegar’s acidity can damage film over time. It won’t immediately ruin film like ammonia might, but chronic use causes problems. Skip the vinegar for windows with film.
Alcohol-Based Cleaners Rubbing alcohol and alcohol-heavy cleaners can affect both the film and adhesive. Some professional installers use alcohol solutions during installation, but that’s different from ongoing maintenance.
Proper Cleaning Tools
The right tools prevent scratches and streaks while making the job easier.
Microfiber Cloths
These are your primary cleaning tool. Microfiber is soft enough not to scratch film while being effective at removing dirt.
Best Practices:
- Use clean cloths only (wash after each use)
- Have several on hand (one for cleaning, one for drying)
- Replace cloths annually or when they show wear
- Avoid fabric softener when washing (reduces absorbency)
Microfiber cloths designed for eyeglasses or electronics work perfectly for window film. The finer and softer, the better.
Rubber Squeegees
Professional window cleaners use squeegees, and you can too, but only after the film has fully cured (30+ days).
Squeegee Requirements:
- Soft rubber blade (not hard plastic)
- Smooth edge (no nicks or damage)
- Clean blade (wipe before and after use)
- Appropriate size for your windows
Squeegees excel at removing cleaning solution without streaks, but technique matters. More on that in the next section.
What Not to Use
Several common cleaning tools will damage film:
Paper Towels They seem convenient but are too abrasive for window film. Paper towels contain wood fibers that can scratch. They also leave lint, creating a mess rather than solving one.
Newspapers Old advice suggested newspapers for cleaning windows. Don’t use them on film. The ink can transfer, and newsprint is abrasive enough to cause micro-scratches.
Sponges Most kitchen sponges are too rough. Even “non-scratch” sponges can damage film. The only exception would be a very soft natural sea sponge, but microfiber cloths work better anyway.
Scrapers or Razor Blades Never, under any circumstances, use a razor blade or scraper on window film. This includes trying to remove stuck-on material like stickers or tape residue. The scraper will gouge the film, creating permanent damage.
Abrasive Pads Steel wool, Scotch-Brite pads, or any scouring pad will destroy window film instantly. This should be obvious, but people sometimes reach for whatever’s under the sink without thinking.
Step-by-Step Cleaning Process
Once your film has cured for at least 30 days, here’s how to clean it properly.
Preparation
- Choose the Right Time Don’t clean windows in direct sunlight or when glass is hot. The cleaning solution evaporates too quickly, leaving streaks. Early morning or cloudy days work best.
- Gather Supplies
- Spray bottle with cleaning solution
- 2-3 clean microfiber cloths
- Squeegee (optional)
- Small bucket of clean water (for rinsing cloths)
- Remove Loose Dust Gently wipe the window with a dry microfiber cloth to remove loose dust and debris. This prevents scratching when you apply wet cleaner.
The Cleaning Process
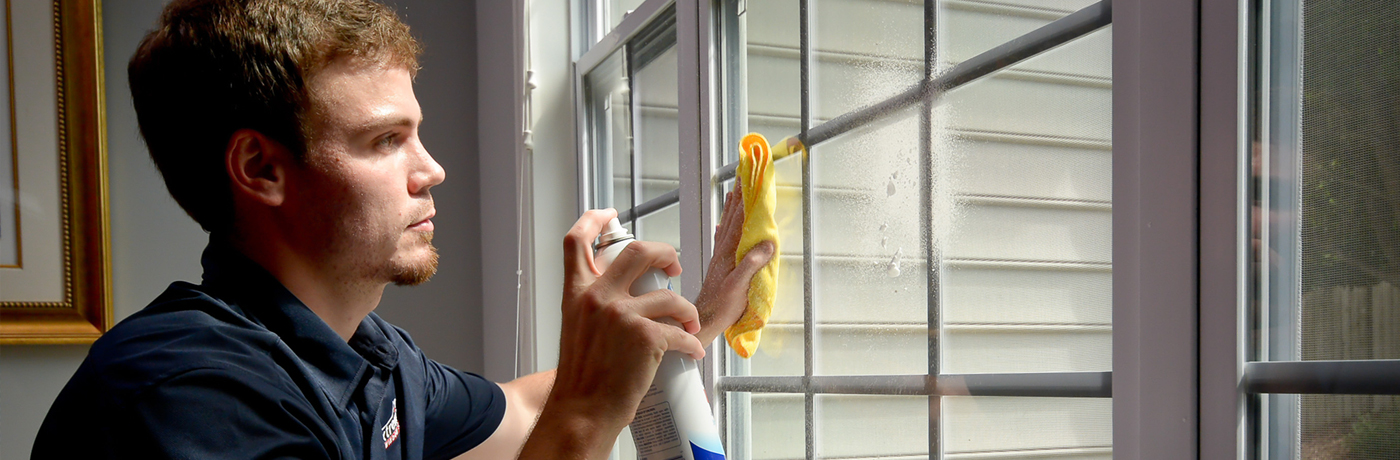
Step 1: Apply Cleaning Solution Spray your cleaner onto a microfiber cloth until damp but not dripping. Don’t spray directly onto the window film. Excess liquid can seep behind the film at edges, causing problems.
Some installers say direct spraying is fine once film is fully cured. Maybe. But spraying onto the cloth first eliminates any risk and uses less cleaner.
Step 2: Wipe the Film Using the dampened cloth, wipe the window in overlapping horizontal or vertical strokes. Work from top to bottom. Apply light to moderate pressure. You’re cleaning, not scrubbing.
For stubborn spots:
- Apply a bit more cleaner to that area
- Let it sit for 10-15 seconds
- Wipe gently again
- Repeat if necessary
If something won’t come off with reasonable effort, it’s probably on the outside of the window, not on the film. Check the exterior glass.
Step 3: Squeegee (Optional) If using a squeegee, pull it across the film in smooth, overlapping strokes from top to bottom. Wipe the squeegee blade with a clean cloth after each stroke to prevent redepositing dirt.
This step isn’t necessary but can speed up the process on large windows while reducing streaks.
Step 4: Dry and Buff Using a clean, dry microfiber cloth, wipe the window again to remove any remaining moisture and prevent streaks. Buff gently in circular motions for a crystal-clear finish.
Step 5: Clean Edges and Corners Fold your microfiber cloth to access corners and edges where the film meets the window frame. These areas accumulate dirt but are often missed during main cleaning.
Dealing with Stubborn Issues
Fingerprints: These usually wipe off easily with your standard cleaning solution. If not, add one extra drop of dish soap to your solution for that specific spot.
Water Spots: Hard water deposits on film (actually on the glass surface beneath) might need distilled water and extra wiping. Avoid the temptation to scrape them off.
Adhesive Residue: If you’ve removed tape or stickers and left sticky residue, use your soap solution and patience. Soak the area, let it sit, wipe gently. Repeat as needed. Don’t use adhesive removers unless specifically labeled safe for window film.
Streaks: Usually caused by:
- Too much soap in cleaning solution
- Dirty cloths
- Cleaning in direct sunlight
- Not buffing with dry cloth
Solution: Clean again with less soap, fresh cloths, and thorough drying.
Cleaning Frequency
How often should you clean window film? It depends on several factors.
General Guidelines
High-Traffic Areas: Windows near doors, in kitchens, or where kids frequently touch: Clean every 2-4 weeks.
Standard Living Spaces: Bedrooms, living rooms, dining rooms: Clean every 1-3 months.
Low-Touch Areas: Upper-floor windows, rooms used infrequently: Clean every 3-6 months.
Outside Exposure: Windows in dusty environments or near construction: Clean as needed, potentially monthly.
Seasonal Considerations
Spring: Pollen season creates a film of yellow dust on windows. You might need to clean more frequently during March-May in Greenville. Focus on exterior glass cleaning, as pollen accumulates outside.
Summer: Rain helps keep exterior glass cleaner, but increased indoor AC use can create more fingerprints on interior film from people touching windows. Plan for monthly cleaning of high-traffic windows.
Fall: Falling leaves and increased wind can dirty windows. Clean after major storms or when you notice significant debris accumulation.
Winter: Generally the cleanest season for windows. Lower traffic through rooms and less outdoor activity means less frequent cleaning needed. Every 2-3 months often suffices.
Don’t Overclean
More cleaning isn’t better. Each cleaning session, even done properly, involves some contact with the film. Excessive cleaning increases cumulative wear.
If your windows don’t look dirty, don’t clean them. Cleaning for the sake of cleaning gains nothing while adding unnecessary wear to the film.
Common Mistakes That Damage Film
Learning what not to do matters as much as proper technique.
Mistake 1: Using Abrasive Materials
This is the number one way people damage their film. Someone grabs whatever cleaning tool is handy, not realizing paper towels or scrubby pads will scratch the film.
The damage isn’t always immediately obvious. Micro-scratches accumulate over time, gradually making film look hazy or dull. By the time you notice, you’ve caused permanent damage.
Solution: Keep designated microfiber cloths specifically for window film cleaning. Store them separately from other cleaning supplies to avoid mix-ups.
Mistake 2: Applying Excessive Pressure
Film is durable but not indestructible. Pressing too hard while cleaning can:
- Create pressure marks in the adhesive
- Cause the film to stretch or distort
- Lead to edge lifting over time
- Damage the film’s hard coat
Solution: Use gentle to moderate pressure. If something isn’t coming off with reasonable effort, it’s either on the wrong side of the glass or needs more soaking time, not more pressure.
Mistake 3: Cleaning Too Soon After Installation
We covered this in the curing section, but it’s worth repeating. Cleaning before 30 days risks disturbing the adhesive bond before it’s fully set.
Solution: Mark your calendar for 30 days post-installation. Until then, live with minor smudges or very gently dust with a dry cloth only.
Mistake 4: Using Ammonia Cleaners Repeatedly
One use of Windex probably won’t destroy your film. But monthly use over years? That will cause discoloration, adhesive breakdown, and premature failure.
Solution: Read cleaner labels. If it contains ammonia, don’t use it on film. Ever. No exceptions.
Mistake 5: Ignoring Professional Installation Instructions
Professional installers provide care instructions after installation. These aren’t suggestions; they’re requirements for warranty coverage.
Ignoring these instructions and damaging your film voids the warranty. Then you’re replacing film at your own expense.
Solution: Keep the care instructions your installer provides. Follow them. If you can’t find them, err on the side of being more conservative (gentler cleaning, less frequent) rather than aggressive. Information about how long home window film lasts often ties directly to proper care practices.
Troubleshooting Issues
Sometimes problems arise despite proper care. Here’s how to address common issues.
Bubbles Appearing After Installation
During First 30 Days: Completely normal. They’ll disappear as the film cures.
After 30 Days: Small bubbles might still be working out. Give them 60 days total before worrying.
After 60 Days: Persistent bubbles might indicate installation issues. Contact your installer. Don’t try to fix them yourself.
Film Peeling at Edges
Cause: Usually from moisture getting behind the film during cleaning or from not allowing proper curing.
Solution: Stop cleaning that window. Contact your installer. Peeling film often qualifies for warranty coverage if caught early.
Prevention: Don’t oversaturate the film with cleaner. Always spray onto cloth first, not directly onto film near edges.
Hazing or Clouding
Recent Installation: Normal during curing, should clear within 30 days.
After Curing: Could be caused by:
- Hard water deposits on exterior glass showing through
- Improper cleaning products damaging the film
- Age-related degradation (after 15+ years)
Solution: Try cleaning the exterior glass first. If that doesn’t help, the issue is likely on or in the film itself. Contact a professional.
Scratches
Fine Scratches: Usually from abrasive cleaning materials or techniques. Unfortunately, these are permanent. They’re cosmetic but don’t affect film performance.
Deep Scratches: These can compromise film integrity. If they’re extensive, you might need film replacement.
Prevention: Use only soft materials and gentle pressure when cleaning.
Streaks That Won’t Go Away
Causes:
- Too much soap in cleaning solution
- Dirty cleaning cloths
- Residue from previous improper cleaning products
- Cleaning in direct sunlight
Solution:
- Mix a fresh batch of cleaning solution with less soap
- Use brand new, clean microfiber cloths
- Clean on a cloudy day or when windows are in shade
- Dry thoroughly with a separate clean cloth
If streaks persist after proper cleaning, they might be deposits between the film and glass, which can’t be cleaned without removing the film.
Maintaining Film Performance
Cleaning affects appearance, but broader care practices affect performance and longevity.
Protecting Against Physical Damage
Furniture Placement: Keep furniture several inches away from filmed windows. When rearranging rooms, avoid dragging furniture across windows.
Window Treatments: If you have blinds or curtains over filmed windows, ensure they don’t rub against the film constantly. The repeated contact can cause scratching over time.
Pet Considerations: Cats scratching at windows can damage film. Dogs pressing noses against glass create smudges but usually don’t cause permanent damage if cleaned properly.
Addressing Warranty Requirements
Most window film warranties require proper maintenance to remain valid. This typically means:
- Using only approved cleaning products
- Following manufacturer care instructions
- Not causing damage through improper cleaning
- Professional installation (DIY installation often voids warranties)
Understanding what window tint warranties cover helps you maintain coverage by following required care practices.
If you damage film through improper care, warranty coverage won’t apply. This makes following care instructions not just good practice but financially important.
Professional Inspection
Having your film professionally inspected every 5-7 years can identify developing issues before they become serious. Installers can spot:
- Edge lifting that might worsen
- Adhesive degradation
- UV damage to the film
- Optimal timing for eventual replacement
This proactive approach extends film life and prevents small problems from becoming expensive ones.
Special Situations
Some scenarios require adjusted care approaches.
High-Humidity Environments
Bathrooms and kitchens with filmed windows need slightly different care.
Challenge: Humidity can cause mineral deposits from water vapor to accumulate on film.
Solution: More frequent light cleaning (every 2-3 weeks) prevents buildup. Ensure bathrooms have adequate ventilation to reduce condensation on windows.
Skylights and High Windows
Windows you can’t easily reach pose obvious challenges.
Options:
- Extension poles with microfiber attachments (specifically designed for window cleaning)
- Professional cleaning services for hard-to-reach areas
- Accepting that these windows won’t be cleaned as frequently
Safety Note: Don’t risk injury trying to reach difficult windows. Professional cleaning is cheaper than medical bills from falling off ladders.
Windows That Open and Close
Opening windows puts stress on film near hinges and locks.
Best Practice:
- Open and close windows gently
- Don’t force windows if they stick
- Keep tracks and mechanisms clean so windows operate smoothly
- When cleaning, pay extra attention to areas near moving parts where film might experience more wear
Historic or Specialty Glass
If you’ve filmed antique or specialty glass windows, extra care prevents damage to both film and underlying glass.
Considerations:
- Historic glass may have imperfections that create bumps under film
- Wavy or textured glass might cause film to adhere unevenly
- Delicate glass requires extra gentle cleaning
These windows might need professional cleaning rather than DIY approaches.
Long-Term Care Strategy
Proper care isn’t just about individual cleaning sessions. It’s about practices over the 15-20 year lifespan of your film.
Year 1-5: Establish Good Habits
The first years set the pattern. Develop consistent, proper cleaning habits:
- Clean quarterly at minimum
- Use only approved products
- Keep microfiber cloths dedicated to window cleaning
- Address issues immediately rather than letting them develop
Year 6-10: Monitor for Aging
Film should still look and perform like new, but start watching for:
- Any edge lifting
- Color changes (particularly with dyed films)
- Performance degradation (increased heat despite film)
Address any concerns promptly to prevent accelerating deterioration.
Year 11-15: Plan for Future
Film is past middle age but should still function well with proper care. Start planning:
- Budget for eventual replacement
- Consider whether newer film technologies offer benefits
- Decide if you’ll re-film or switch to different solutions
Year 15-20: Assess Condition
Film reaching 15-20 years has delivered full value. Assess whether:
- Performance still meets your needs
- Appearance remains acceptable
- Replacement timing makes sense for other home projects
Well-maintained film often performs adequately past 20 years, but replacement becomes reasonable to consider. Understanding how home window tinting works helps you evaluate whether newer technologies might offer improvements worth considering when replacement time eventually arrives.
When to Call a Professional
Some situations exceed DIY capabilities.
Professional Help Needed For:
- Significant film damage (large scratches, peeling, etc.)
- Persistent haziness that cleaning doesn’t resolve
- Edge lifting that’s getting worse
- Any situation where warranty coverage might apply
- Windows you can’t safely access for cleaning
- Stubborn stains or deposits that won’t respond to proper cleaning
Don’t Try DIY Repairs: Attempting to fix damaged film yourself usually makes problems worse. Professionals have tools and expertise to assess whether repair is possible or replacement is necessary.
The Care ROI
Why does all this care matter? Because it protects your investment.
Window film represents a significant investment in your home’s comfort and efficiency. Proper care ensures you receive full value over the film’s entire lifespan.
The Math:
- Film installed properly and cared for: 18-20 year lifespan
- Film installed properly but poorly maintained: 10-12 year lifespan
- Lost years: 6-8 years
- Value of lost years: Thousands in premature replacement costs
The time spent cleaning properly, maybe 20-30 minutes every few months, protects thousands of dollars in film value. That’s worthwhile return on a minimal time investment.
Simple Care Summary
Strip away all the details, and caring for window film comes down to these basics:
Wait 30 days after installation before cleaning.
Use only soft microfiber cloths and ammonia-free cleaners or mild soap and water.
Clean gently, from top to bottom, drying thoroughly.
Don’t use paper towels, scrapers, or abrasive materials.
Clean every 1-3 months depending on the window’s exposure and use.
Follow these five principles, and your window film will look great and perform well for its entire rated lifespan. Violate them, and you’ll experience premature failure, voided warranties, and unnecessary replacement costs.
The care requirements aren’t onerous. They’re straightforward and quick once you establish the habit. The payoff is film that continues delivering heat reduction, UV protection, and whatever benefits led you to install it in the first place, for 15-20 years without issues.
That’s the goal of proper care: uninterrupted performance over decades. Get the basics right, and your window film becomes a home improvement you maintain easily and forget about except during quarterly cleaning sessions.
